
I Open Sourced My Game
Building CanyonRunner was a tremendous amount of fun, thanks largely to Richard Davey's excellent Phaser framework. Along the way, I was assisted by many helpful Phaser community members and developers, so I wanted to give back by:
- Open sourcing my game (check out the repo here)
- Offering code samples and explaining some of the features I implemented
I built this game from start to finish in 76 days. In the course of developing it, one of the running themes I noticed on the Phaser forums was that most developers were tackling their first game and were unsure about how to implement common game features like saved games, multiple levels, different experiences for mobile and desktop, etc.
Phaser is well organized and documented, so while its various API's and systems were easy to get started with, it was less clear to many developers how to fit everything together into a coherent gaming experience. I open sourced CanyonRunner and decided to do an in-depth post about its various features in order to create a resource for other developers that might be in the middle of developing their own HTML5 game.
Hopefully some of the features I built into CanyonRunner, such as player-specific saved games, multiple levels each with their own atmosphere and game mechanics, different experiences optimized for desktop / mobile, and alternate endings determined by player performance, will resonate with and assist other game developers.
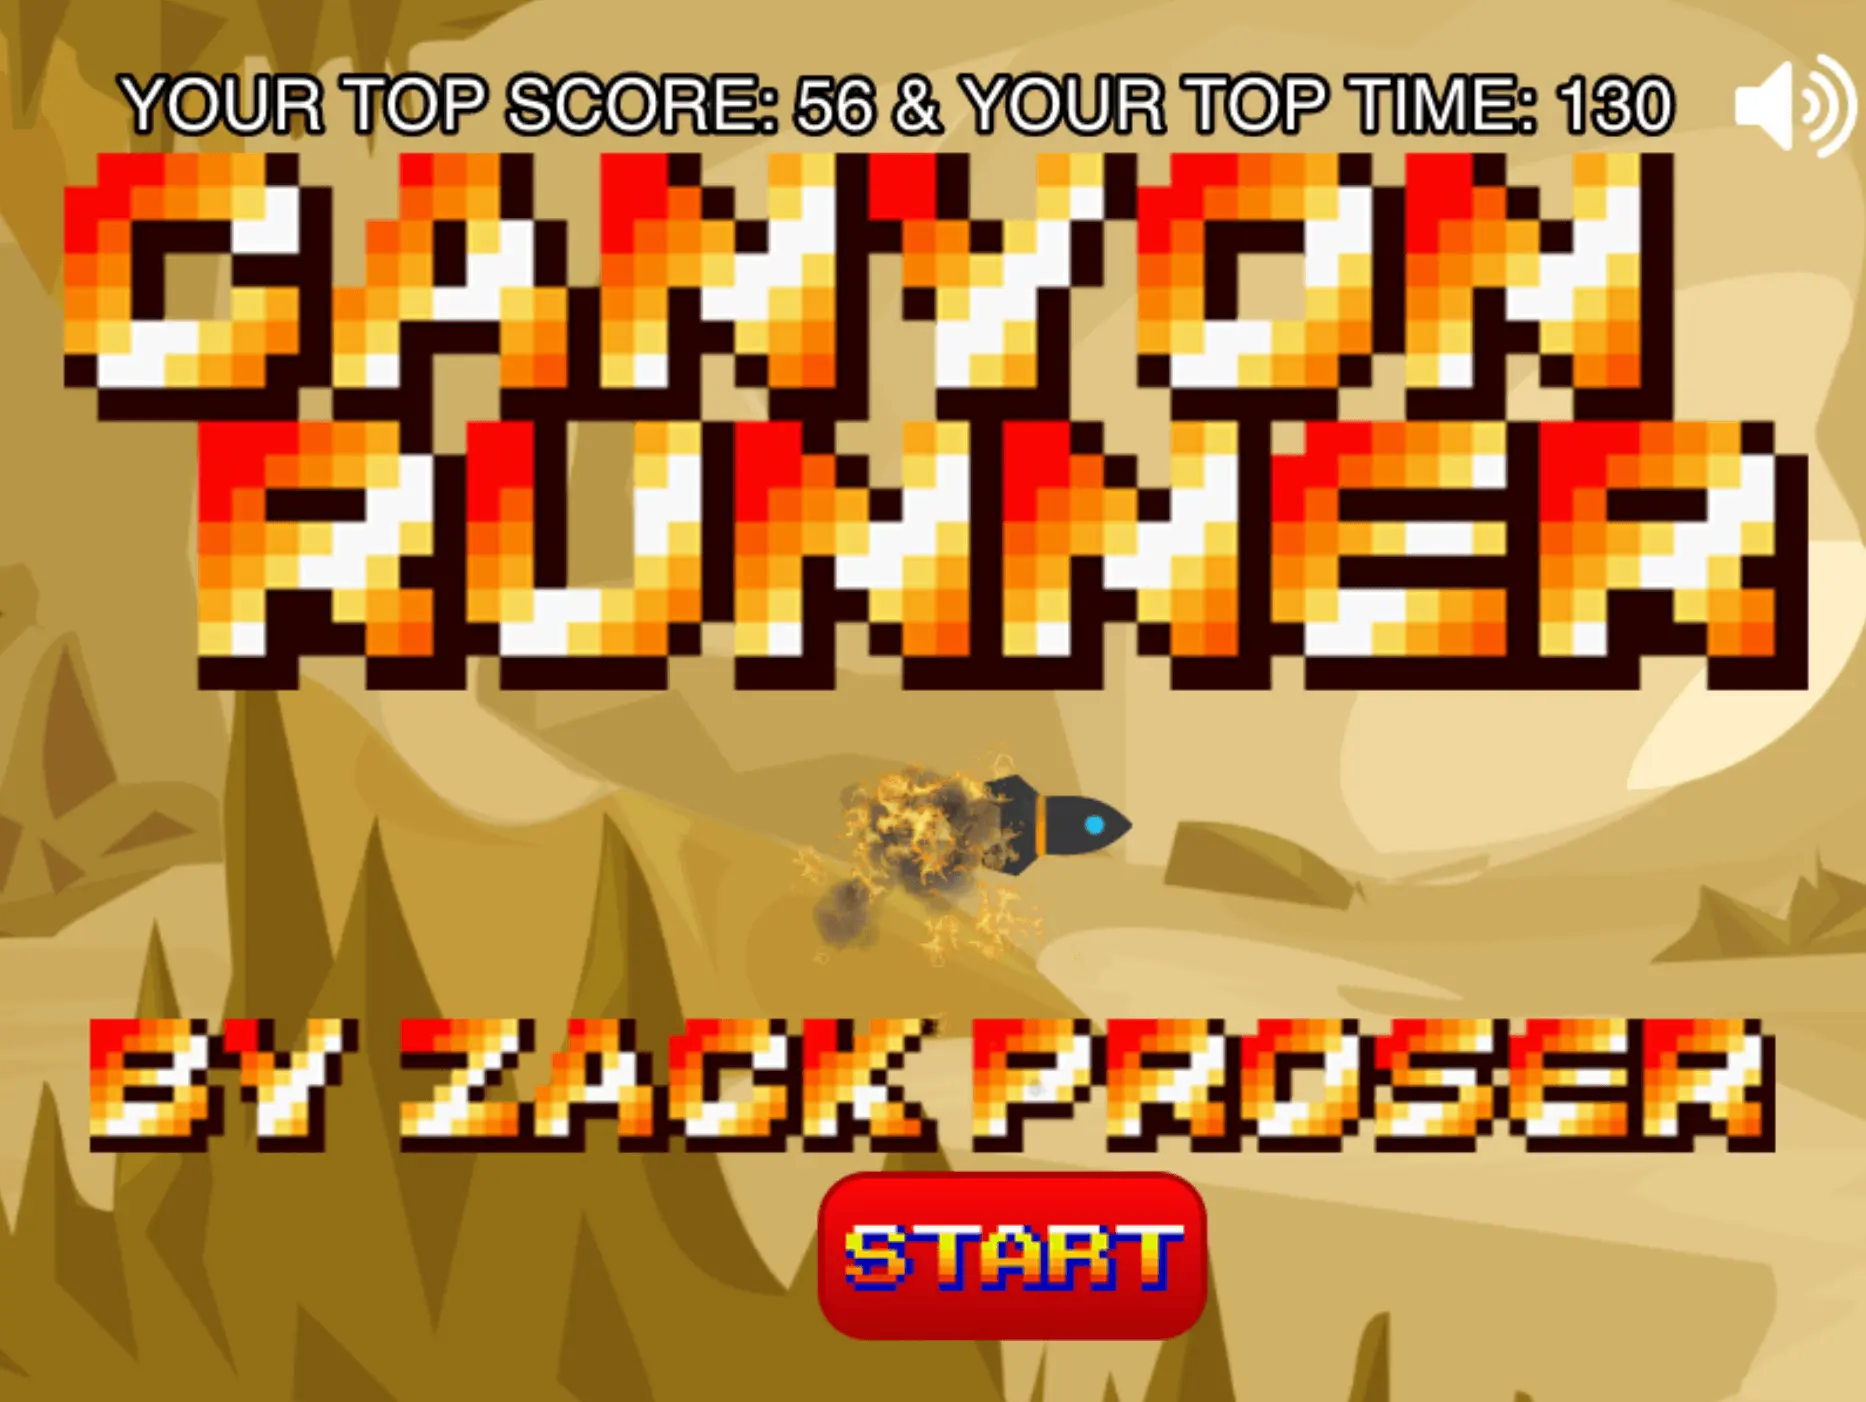
To get a sense of CanyonRunner, or to play it through in its entirety (which will take you less than 10 minutes if you make zero mistakes), click here to play!
Screenshots
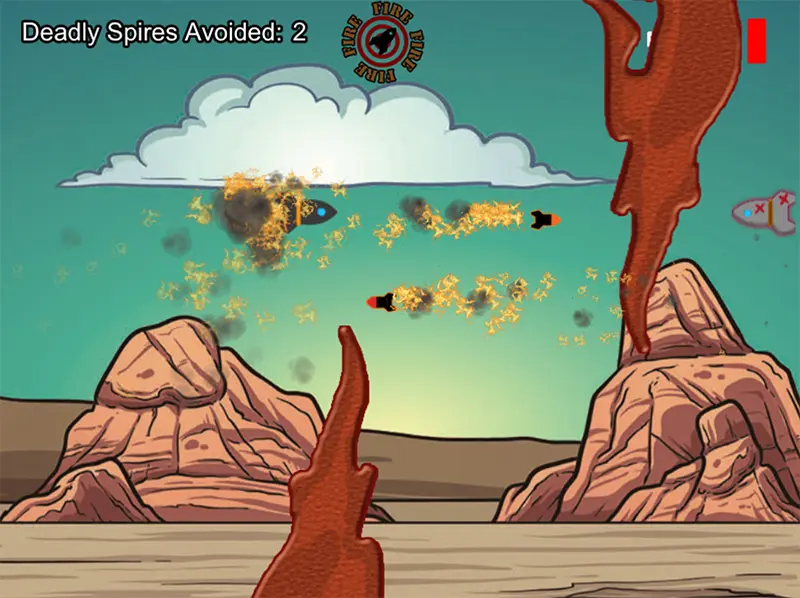
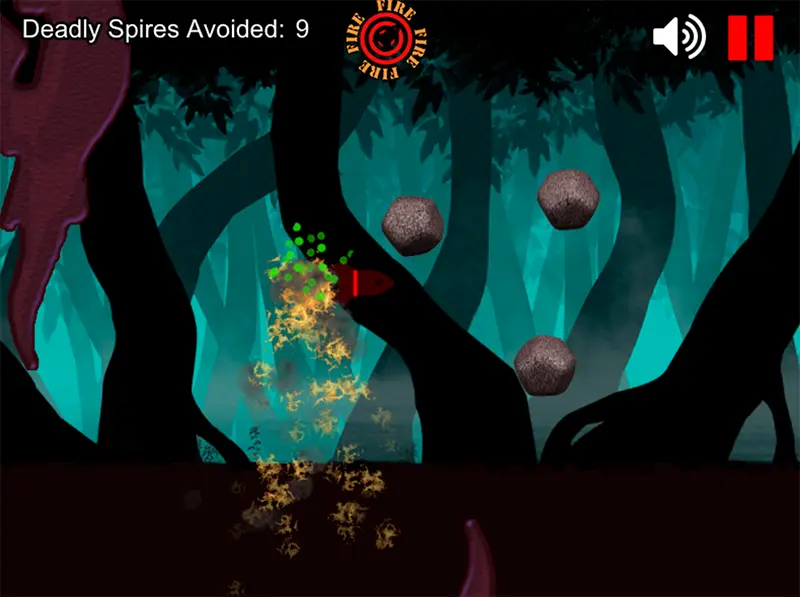
Here's a look at some screenshots from the actual game. I wanted the game to have a retro feel. At the same time, the story, presented via inter-level navigation sequences, builds up an eerie atmosphere.
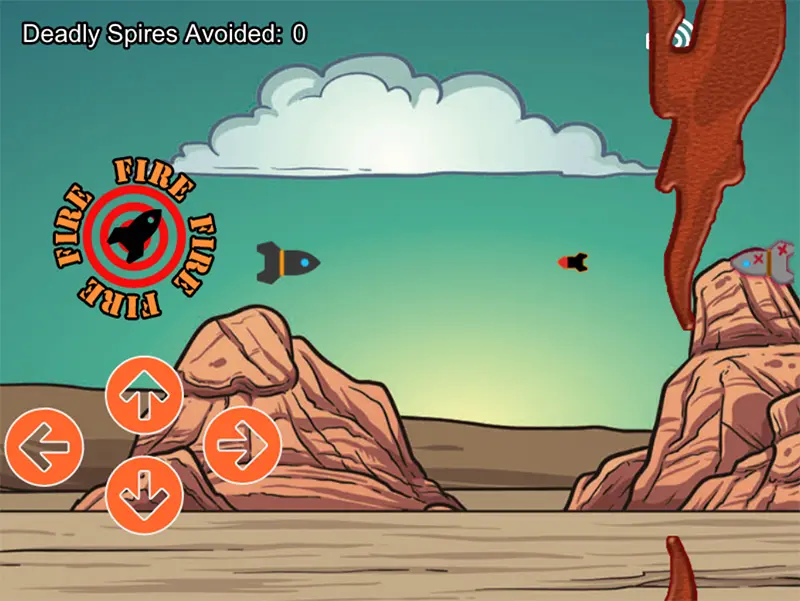
Intense Aerial Dogfights. Fight Off Marauding Bandits.
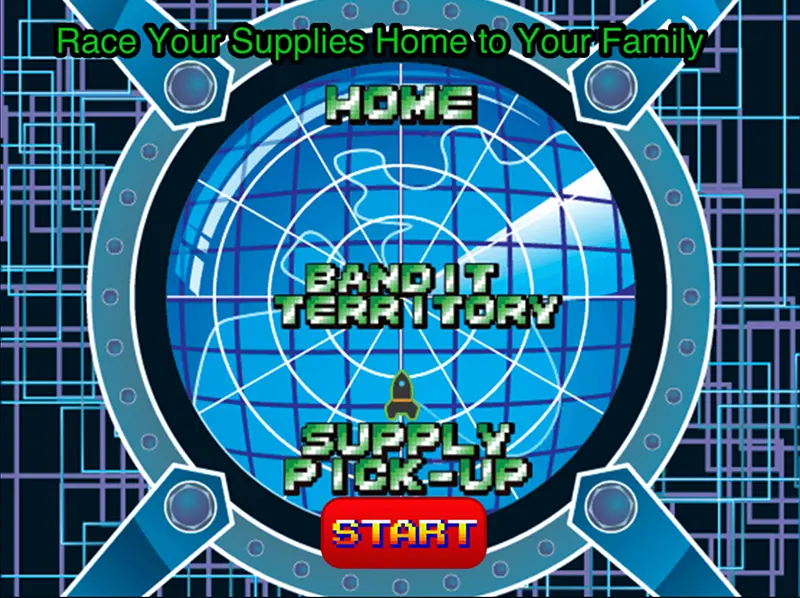
Wind Your Way Through the Eerie Story
Intense Environmental Effects
Auto-detects Mobile agents and renders a touchpad
Catchy Music Keeps The Pace Throughout The Game
Save System Keeps Your Score & Progress
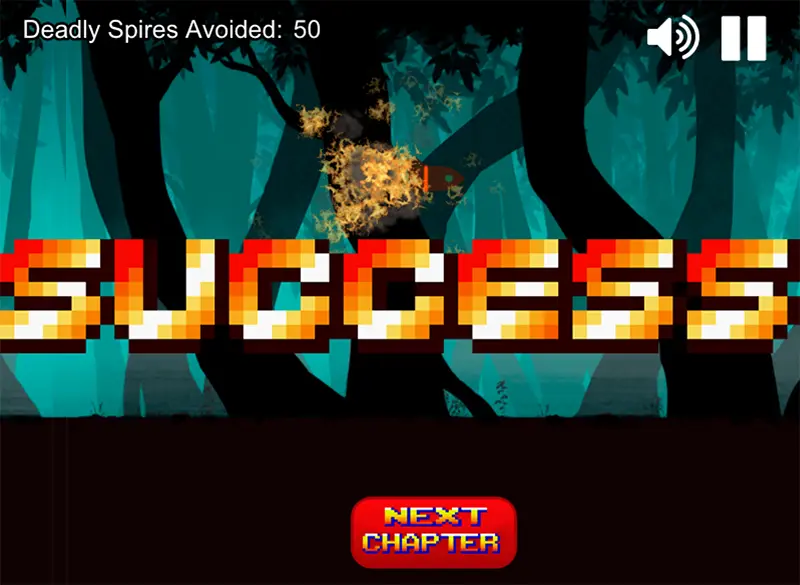
Multiple Endings For Higher Replay Value
Playthrough Video
Want to get a sense of the gameplay without dodging spires yourself? Watch this full playthrough of the game to quickly get up to speed on the feel and main game mechanics of CanyonRunner.
Table of Contents
What you'll find in this post:
- Game overview
- Project structure
- Using Node.js as a simple server
- Creating a preloader
- Creating a splash screen
- Linking separate levels
- Creating a save system
- Creating different experiences for desktop and mobile
- Creating multiple endings
- Settings buttons - pause & mute
Game overview
CanyonRunner is a 2D side-scrolling action & adventure game, complete with a story, two possible endings, automatically saved game progress, aerial dogfights and air to air missle combat, and atmospheric special effects.
You assume the role of the mysterious CanyonRunner, a lone pilot navigating their rocket through a perilous 3 stage journey as they struggle to return to their family with desperately needed supplies.
Depending upon their performance, players are shown one of two possible endings after completing the game.
Project Structure
The CanyonRunner project is structured such that:
- The development workflow is easy to understand and organized
- Building a packaged and optimized distribution of the game can be done in one step
You can view the full project on Github here if you want to explore the structure on your own.
Let's take a look at the project's file tree, then consider the general purpose of each directory in turn:
    .
    ├── Gruntfile.js
    ├── assets
    │   ├── audio
    │   │   ├── audio.json
    │   │   ├── audio.m4a
    │   │   └── audio.ogg
    │   ├── backgrounds
    │   │   ├── desert-open.png
    │   │   ├── level1-background.png
    │   │   ├── level2-background.png
    │   │   ├── level3-background.png
    │   │   └── sad-desert.png
    │   ├── favicon.png
    │   └── sprites
    │       ├── advance-button.png
    │       ├── asteroid1.png
    │       ├── asteroid10.png
    │       ├── asteroid11.png
    │       ├── asteroid12.png
    │       ├── asteroid13.png
    │       ├── asteroid14.png
    │       ├── asteroid15.png
    │       ├── asteroid16.png
    │       ├── asteroid17.png
    │       ├── asteroid18.png
    │       ├── asteroid19.png
    │       ├── asteroid2.png
    │       ├── asteroid20.png
    │       ├── asteroid3.png
    │       ├── asteroid4.png
    │       ├── asteroid5.png
    │       ├── asteroid6.png
    │       ├── asteroid7.png
    │       ├── asteroid8.png
    │       ├── asteroid9.png
    │       ├── bandit-missile.png
    │       ├── bandit.png
    │       ├── canyon-runner-splash.png
    │       ├── cry-about-it-button.png
    │       ├── down-arrow.png
    │       ├── explosion1.png
    │       ├── explosion10.png
    │       ├── explosion11.png
    │       ├── explosion12.png
    │       ├── explosion13.png
    │       ├── explosion14.png
    │       ├── explosion15.png
    │       ├── explosion16.png
    │       ├── explosion2.png
    │       ├── explosion3.png
    │       ├── explosion4.png
    │       ├── explosion5.png
    │       ├── explosion6.png
    │       ├── explosion7.png
    │       ├── explosion8.png
    │       ├── explosion9.png
    │       ├── fire-missile-button-desktop.png
    │       ├── fire-missile-button-mobile.png
    │       ├── fire1.png
    │       ├── fire2.png
    │       ├── fire3.png
    │       ├── happy-splashscreen.png
    │       ├── healthkit.png
    │       ├── healthorb1.png
    │       ├── healthorb2.png
    │       ├── healthorb3.png
    │       ├── home-burning.png
    │       ├── how-to-play-desktop.png
    │       ├── how-to-play-mobile.png
    │       ├── inverted-rock.png
    │       ├── kaboom.png
    │       ├── left-arrow.png
    │       ├── missile.png
    │       ├── navigation-bandit.png
    │       ├── navigation-home.png
    │       ├── navigation-supply.png
    │       ├── pause-button.png
    │       ├── play-again-button.png
    │       ├── progress.png
    │       ├── right-arrow.png
    │       ├── rock.png
    │       ├── rocket-sprite.png
    │       ├── sad-splashscreen.png
    │       ├── scrap1.png
    │       ├── scrap2.png
    │       ├── scrap3.png
    │       ├── scrap4.png
    │       ├── share-the-love-button.png
    │       ├── smoke-puff.png
    │       ├── sound-icon.png
    │       ├── sprites.json
    │       ├── sprites.png
    │       ├── start-button.png
    │       ├── success.png
    │       ├── try-again-button.png
    │       └── up-arrow.png
    ├── build
    │   ├── CanyonRunner.js
    │   ├── CanyonRunner.min.js
    │   ├── config.php
    │   ├── custom
    │   │   ├── ninja.js
    │   │   ├── ninja.min.js
    │   │   ├── p2.js
    │   │   ├── p2.min.js
    │   │   ├── phaser-arcade-physics.js
    │   │   ├── phaser-arcade-physics.min.js
    │   │   ├── phaser-ninja-physics.js
    │   │   ├── phaser-ninja-physics.min.js
    │   │   ├── phaser-no-libs.js
    │   │   ├── phaser-no-libs.min.js
    │   │   ├── phaser-no-physics.js
    │   │   ├── phaser-no-physics.min.js
    │   │   ├── pixi.js
    │   │   └── pixi.min.js
    │   ├── phaser.d.ts
    │   ├── phaser.js
    │   ├── phaser.map
    │   └── phaser.min.js
    ├── compiler.jar
    ├── css
    │   └── stylesheet.css
    ├── icons
    │   ├── app_icon_1024x1024.png
    │   ├── app_icon_114x114.png
    │   ├── app_icon_120x120.png
    │   ├── app_icon_144x144.png
    │   ├── app_icon_152x152.png
    │   ├── app_icon_256x256.png
    │   ├── app_icon_512x512.png
    │   ├── app_icon_57x57.png
    │   ├── app_icon_60x60.png
    │   ├── app_icon_72x72.png
    │   └── app_icon_76x76.png
    ├── images
    │   └── orientation.png
    ├── index.html
    ├── package.json
    ├── server.js
    └── src
        ├── Boot.js
        ├── EmotionalFulcrum.js
        ├── EveryThingYouBelievedAboutYourFamilyWasHellishlyWrong.js
        ├── HomeSweetHome.js
        ├── HowToPlay.js
        ├── Level1.js
        ├── Level2.js
        ├── Level3.js
        ├── MainMenu.js
        ├── NavigationBandit.js
        ├── NavigationHome.js
        ├── NavigationSupply.js
        └── Preloader.js

    10 directories, 143 files
Project root
.gitignore: This special file tells the version control system, git, which files it can "ignore" or not worry about placing under source control. If your game project is generating logs, debug output, or uses node_modules, you can save space in your repository by specifying these files and directories in your .gitignore file.
Gruntfile.js: I used the command line task-runner Grunt in order to automate some of tedious and repetitive development tasks. Grunt will be familiar to many web developers, but for those of you who have not encountered it before, Grunt allows you to define tasks, namely those that you find yourself repeatedly having to perform while developing, and bundle them together into a single or a few commands.
As an example, if you are working with scss, you may constantly find yourself performing the same mundane tasks as you build out your project, such as concatenting 4 different scss files together, then compiling them to raw css, then minifying that resulting css file and moving it into a specific folder where it can be served.
Instead of doing this manually each time, you can configure a grunt task to do exactly these steps in that order - and all you'd have to do is type "grunt" on the command line. Better yet, Grunt can "watch" certain files or directories for changes and then perform associated actions on its own. You can even set up completely customized tasks to perform, as we'll see in a moment with the Google Closure Compiler for optimizing JavaScript.
Grunt can be painful to set up and configure, and often times it's overkill for a small project, but it can effectively streamline your workflow if you're dealing with multiple source files, concatenation and minification. In CanyonRunner, as in many Phaser projects, I save off each game state as a separate javascript file for sanity while developing, but we only want to serve as few minified javascript files as possible with our finished game. This makes Grunt a logical choice.
compiler.jar: This is the Google Closure Compiler, which is a tool that makes JavaScript download and run faster. After concatenating all my custom JavaScript into a single file, I run it through the Closure Compiler so that the final output .js file that is served up by the game is as lean and mean as possible. The compile command within the exec task uses the compiler.jar to generate the optimized CanyonRunner.min.js, save it to the correct build directory, and echo a string confirming the task completely successfully:
    module.exports = function(grunt) {

      // Project configuration.
      grunt.initConfig({
        pkg: grunt.file.readJSON('package.json'),
        concat: {
          options: {
            separator: ';'
          },
          dist: {
            src: ['src/*.js'],
            dest: 'build/<%= pkg.name %>.js'
          }
        },
        uglify: {
          options: {
            banner: '/*! <%= pkg.name %> <%= grunt.template.today("yyyy-mm-dd") %> Copyright Zack Proser */\n'
          },
          dist: {
            files: {
              'build/<%= pkg.name %>.min.js' : ['<%= concat.dist.dest %>']
            }
          }
        },
        exec: {
          //Compile Final JS File
          compile: 'java -jar compiler.jar --js build/CanyonRunner.js --js_output_file build/CanyonRunner.min.js --warning_level QUIET && echo "Successfully Compiled CanyonRunner Dist Build"',
          //Output Clean Distribution Build
          createDistributionFolder: "mkdir -p CanyonRunner-distribution/{assets/{audio,backgrounds,sprites},build/custom,css,icons,images}",
          //Move assets
          copyIndex: 'cp index.html ./CanyonRunner-distribution',

          copyFavicon: 'cp ./assets/favicon.png ./CanyonRunner-distribution/assets',

          copyAudio: "cp ./assets/audio/{audio.ogg,audio.m4a,audio.json} ./CanyonRunner-distribution/assets/audio",

          copySprites: "cp ./assets/sprites/{sprites.png,sprites.json} ./CanyonRunner-distribution/assets/sprites",

          copyBackgrounds: "cp ./assets/backgrounds/{desert-open.png,level1-background.png,level2-background.png,level3-background.png,sad-desert.png} ./CanyonRunner-distribution/assets/backgrounds",

          copyPhaser: "cp ./build/custom/phaser-arcade-physics.min.js ./CanyonRunner-distribution/build/custom",

          copyCanyonRunner: "cp ./build/CanyonRunner.min.js ./CanyonRunner-distribution/build",

          copyCss: "cp ./css/stylesheet.css ./CanyonRunner-distribution/css",

          copyIcons: "cp ./icons/* ./CanyonRunner-distribution/icons",

          copyImages: "cp ./images/* ./CanyonRunner-distribution/images"
        }
      });

      grunt.loadNpmTasks('grunt-contrib-uglify');
      grunt.loadNpmTasks('grunt-contrib-concat');
      grunt.loadNpmTasks('grunt-exec');

      grunt.registerTask('default', ['concat', 'uglify', 'exec']);
    };
Note that the assets are also moved by Grunt into their correct destinations during the build. Once your Gruntfile is in place and configured correctly, it's much easier to just type "grunt" in your terminal and get a perfectly built game as an output than to build one manually. This is doubly true if you're testing something that requires you to make changes and then build, or if you're trying to remember how to build the project after 3 months of not touching it.
Creating a Distribution-Ready Build in One Command
The reason we soldier through the initial tedium of configuring Grunt is that once we have everything set up, we can literally build a distribution-ready copy of our game in a single command:
$ grunt
If you've cloned the CanyonRunner repo and are following along, you can cd into the project root and type grunt in your terminal to see what I'm talking about. Grunt will execute the tasks configured in your Gruntfile to concatenate all the javascript files, run them through the Google Closure Compiler, copy all the assets correctly and put everything where it belongs: into a single new directory called CanyonRunner-distribution which will appear in the project root.
This distribution directory can now be named whatever you want and handed off to a customer or game hosting site for distribution. Having this build infrastructure in place will save you dozens of hours over the course of a project.
Directories at a Glance
Now, let's consider the purpose of each directory.
assets. This directory holds the audio files, background images, and spritesheets used by our game.
build. This directory is home to the files that are required by our game to work, such as the actual Phaser framework files. Our build tool gathers up only what is needed from here when creating a distribution.
css. Holds the simple stylesheet required to make the orientation (rotate your phone!) image work properly.
icons. Holds the various sized app icons that would be required by, say, an iOS app that was loading your Phaser game in a webview.
images. This directory holds a special image required by Phaser to render the screen telling the user they should rotate their phone to landscape mode in order to play the game. When phaser detects that the user's phone is being held upright, this image is used to render that hint on screen.
node_modules. This is the directory where npm, node's package manager, installs dependencies. When you require a module in your node.js script, one of the places node looks for that module is here. In the case of this project, our server.js file (see next section) uses the express module, which would end up here after running the npm install command.
src. Arguably the most important directory, this holds all of our separate .js files - for each level, menu, interstitial scene, etc. Once we have finished our game and we're ready to make a build, our build tool will look into this directory to gather together all the separate files into one single concatenated and minified javascript file that's fit for distribution with our finished game.
Running a local fileserver to ease development with node.js
While developing a Phaser game it is very helpful to have a local fileserver that we can run with a single command. This makes it easy to serve up our index.html file locally, which loads all our Javascript and Phaser files so we can see and play our game as we're building it.
You could set up a traditional web stack with apache, or use something that handles this for you such as Mamp. I feel these options are too involved for what we want to do: simply serve up our index.html file locally so we can view it at localhost:8080. Our index.html file will in turn load the Phaser library, and then our game itself so we can test changes with low hassle and iterate quickly.
Follow these instructions to install Node.js on your machine. Once that's done, you can run the server.js file in the project root by typing:
$ server.js
Now you can play and test your Phaser game by typing localhost:8080 into your browser.
Let's take a look at what this simple utility script looks like:
    var
        express = require('express'),
        app = express(),
        port = 8080
    ;

    //Set the 'static' directory to the project root - where index.html resides
    app.use(express.static('./'));

    //When root is requested, send index.html as a response
    app.get('/', function(req, res){
        res.send('index.html');
    });

    //Create the server by listening on the desired port
    var server = app.listen(port, function() {
        console.log('Visit localhost:' + port + ' to see your Phaser game');
    });
Notice we're requiring the Express module to abstract away serving static assets. This means you'll need to install express library locally to your project in order for server.js to work. If you don't already have express installed globally on your system, type:
$ sudo npm i
This command will pull down all required dependencies from npm, node's package management system.
With our simple fileserver in place, all we have to do to view changes to our source code or playtest our game is run our server and visit localhost:8080.
Creating a preloader
Phaser games use preloaders as special game states to perform setup and configuration tasks that can or must be run before a more interactive game state is loaded.
Let's examine CanyonRunner's preloader state. It has a few important setup tasks to perform. First, it sets up the background for the splashscreen and loads the various levels' background images.
There's a very handy Phaser convenience feature known as a Preload Sprite that I'm taking advantage of here to render the loading bar that says "loading" and expands from 0 to 100% as the splashscreen itself is being prepared. First, you set up the sprite that will be used as the preloadBar. Then you can call the method setPreloadBar and pass in the sprite - Phaser handles all the internal timing and display logic for us.
    CanyonRunner.Preloader = function (game) {

        this.ready = false;
    };

    CanyonRunner.Preloader.prototype = {

        preload: function () {

            this.background = this.add.sprite(0, 0, 'desert-open');
            this.splashscreen = this.add.sprite(0, 0, 'sprites', 'canyon-runner-splash');

            this.preloadBar = this.add.sprite(this.game.world.centerX - 127.5, this.game.world.centerY, 'sprites', 'progress');
                this.load.setPreloadSprite(this.preloadBar);

            this.game.load.image('desert-open', 'assets/backgrounds/desert-open.png');
            this.game.load.image('sad-desert', 'assets/backgrounds/sad-desert.png');
            this.game.load.image('dark-forest', 'assets/backgrounds/level3-background.png');
            this.game.load.image('desert', 'assets/backgrounds/level1-background.png');
            this.game.load.image('desert2', 'assets/backgrounds/level2-background.png');

            //AudioSprites
            if (this.game.device.firefox || this.game.device.chrome || this.game.device.chromeOS) {

                this.game.load.audiosprite('sound', 'assets/audio/audio.ogg', 'assets/audio/audio.json');

            } else {

                this.game.load.audiosprite("sound", 'assets/audio/audio.m4a', 'assets/audio/audio.json');
            }
        },

        create: function () {

            this.preloadBar.cropEnabled = false;

        },

        update: function () {

            if (this.cache.isSoundDecoded('sound') && this.ready == false)
            {
                this.state.start('MainMenu');
            }

        }

    };
Optimizing Asset Delivery with Audiosprites
Another important task that falls to the preloader is to determine which type of audiosprite should be loaded. An audiosprite is a single file that contains all the sound effects and songs required by the game mashed together, to save space and bandwidth during asset delivery. Tools that create audiosprites also export a map file, usually in json or xml, that explicitly states the time slices of the audiosprite wherein each individual sound and song starts and ends. Let's take a look:
    {
       "resources":[
          "audio.ogg",
          "audio.m4a",
          "audio.mp3",
          "audio.ac3"
       ],
       "spritemap":{
          "3rdBallad":{
             "start":0,
             "end":39.18222222222222,
             "loop":true
          },
          "AngryMod":{
             "start":41,
             "end":99.79292517006803,
             "loop":true
          },
          "Ariely":{
             "start":101,
             "end":132.64009070294784,
             "loop":true
          },
          "angel":{
             "start":134,
             "end":140.53786848072562,
             "loop":true
          },
          "aronara":{
             "start":142,
             "end":202.12081632653062,
             "loop":true
          },
          "crash":{
             "start":204,
             "end":205.94902494331066,
             "loop":false
          },
          "explosion":{
             "start":207,
             "end":221.7374149659864,
             "loop":false
          },
          "heal":{
             "start":223,
             "end":226.0316553287982,
             "loop":false
          },
          "launch":{
             "start":228,
             "end":232.39873015873016,
             "loop":false
          },
          "missile-lock":{
             "start":234,
             "end":238.99954648526077,
             "loop":false
          },
          "missile-reload":{
             "start":240,
             "end":241.27274376417233,
             "loop":false
          },
          "negative":{
             "start":243,
             "end":243.68643990929706,
             "loop":false
          },
          "rocket-start":{
             "start":245,
             "end":247.20734693877552,
             "loop":false
          },
          "sonar-found":{
             "start":249,
             "end":252.10131519274375,
             "loop":false
          },
          "sonar":{
             "start":254,
             "end":260.26213151927436,
             "loop":true
          },
          "success":{
             "start":262,
             "end":308.4660317460317,
             "loop":true
          },
          "swoosh":{
             "start":310,
             "end":311.2408163265306,
             "loop":false
          }
       }
    }
This mapping file allows frameworks like Phaser to efficiently deliver a single audio file, while still allowing the game developer the convenience of referring to individual sounds and songs by their key names while programming.
After developing CanyonRunner by using separate audio files for each sound, I used a free tool to create one single audiosprite for each supported filetype (different browsers support different audiosprite filetypes). That's why the preloader uses Phaser's device helper methods to determine which browser the player is using. Firefox and Chrome support .ogg files, while Safari supports .m4a. You can convert your final audiosprite to both formats and include it in your assets directory. With your preloader determining the proper format based on your user's browser, each player will get a single optimized audiosprite that will run perfectly for them.
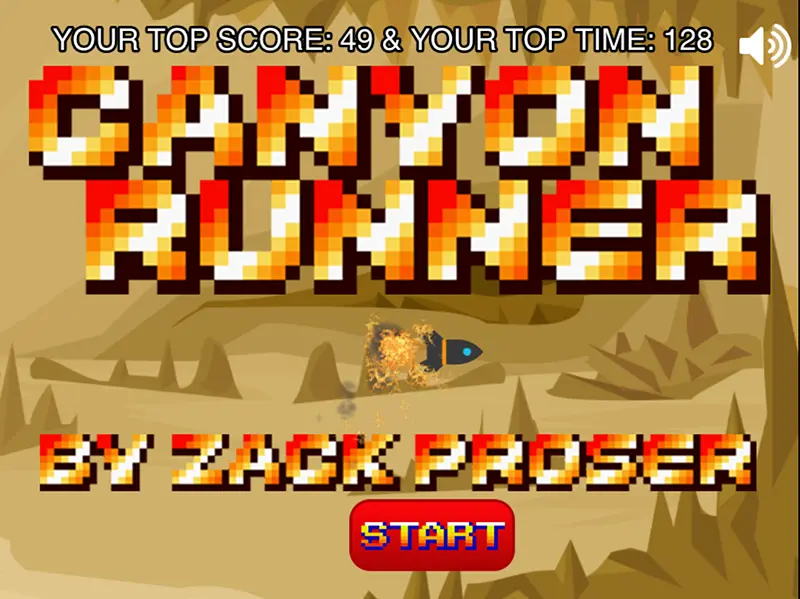
Creating a splash screen
Successfully building a complete game requires attention to lots of small details which, taken together, build up a feeling of a polished and finished product.
One of the first contact points our players will have with our game is the splashscreen. A good splashscreen can set up the feel and mood of the game, begin introducing the themes that will run throughout, and get the player excited about playing. Let's take a look at how we can create a splashscreen for our Phaser HTML5 game.
Here is the full MainMenu.js file for CanyonRunner, which sets up the intro splashscreen and waits for the player to click the Start button:
    CanyonRunner.MainMenu = function(game) {

    };

    CanyonRunner.MainMenu.prototype = {

        create: function() {
            this.sound = this.game.add.audioSprite('sound');

            //Check if Returning Player & If Has Level Progress Saved
            this.playerStats;
            if (localStorage.getItem('Canyon_Runner_9282733_playerStats') != null) {
                this.playerStats = JSON.parse(localStorage.getItem('Canyon_Runner_9282733_playerStats'));
            } else {
                this.playerStats = {
                    topScore: 0,
                    topTime: 0,
                    returnPlayerToState: 'HowToPlay'
                };
            }
            //Load Main Menu
            this.background = this.game.add.tileSprite(0, 0, 1200, 600, 'desert-open');
            this.background.fixedToCamera = true;
            this.splashscreen = this.add.sprite(0, 0, 'sprites', 'canyon-runner-splash');

            this.sound.play('aronara');

            this.soundButton = this.game.add.button(this.game.world.centerX + 335, this.game.world.centerY - 285, 'sprites', this.toggleMute, this, 'sound-icon', 'sound-icon', 'sound-icon');
            this.soundButton.fixedToCamera = true;
            if (!this.game.sound.mute) {
                this.soundButton.tint = 16777215;
            } else {
                this.soundButton.tint = 16711680;
            }
            //Read Player Stats & Display
            if (this.playerStats.topScore > 0 && this.playerStats.topTime > 0) {
                this.playerStatTextStyle = {
                    font: "30px Helvetica",
                    fill: "#fff",
                    stroke: "#000",
                    strokeThickness: 5,
                    align: "center"
                };
                this.playerStatString = "YOUR TOP SCORE: " + this.playerStats.topScore + " & YOUR TOP TIME: " + Math.round(this.playerStats.topTime);
                this.playerStatText = this.game.add.text(this.game.world.centerX - 350, this.game.world.centerY - 275, this.playerStatString, this.playerStatTextStyle);
            }

            //Create Intro Player
            this.player = this.game.add.sprite(64, 64, 'sprites', 'rocket-sprite');
            this.player.y = 320;
            this.game.physics.enable(this.player, Phaser.Physics.ARCADE);
            this.player.body.bounce.y = 0.2;
            this.player.body.collideWorldBounds = true;
            this.player.body.setSize(64, 34, 0, 15);

            //Set up Initial Events
            this.game.time.events.add(300, this.introFlyingScene, this);

            this.startbutton = this.add.button(350, 500, 'sprites', this.startGame, this, 'start-button', 'start-button', 'start-button');
        },

        update: function() {
            //Scroll Background
            if (!this.jetFired) {
                //Scroll background for flying appearance
                this.background.tilePosition.x -= 2;
            } else {
                this.background.tilePosition.x -= 10;
            }

            //Start Afterburners
            if (this.burnEngines) {
                this.emitter.emitX = this.player.x - 25;
                this.emitter.emitY = this.player.y + 30;
            }
        },
        toggleMute: function() {
            if (!this.mute) {
                this.game.sound.mute = true;
                this.mute = true;
                this.soundButton.tint = 16711680;
            } else {
                this.game.sound.mute = false;
                this.mute = false;
                this.soundButton.tint = 16777215;

            }
        },
        introFlyingScene: function() {

            //Fly Rocket to Center Screen
            this.introTween = this.game.add.tween(this.player);
            this.introTween.to({
                x: 420
            }, 2000);
            this.introTween.start();

            //Fly the ship into view and do a barrel roll
            this.introFlyingTimer = this.game.time.create(this.game);
            this.introFlyingTimer.add(1100, function() {
                //this.doABarrelRoll();
                this.hoverShipAnimation();
            }, this);
            this.introFlyingTimer.start();

            //Turn on Afterburners
            this.engineBurnTimer = this.game.time.create(this.game);
            this.engineBurnTimer.add(2000, function() {
                this.startEngines();
                this.jetFired = true;
            }, this);
            this.engineBurnTimer.start();
            this.initialPauseTimer = this.game.time.create(this.game);
            //Pause the Player
            this.initialPauseTimer.add(2500, function() {
                this.hoverShip = false;
            }, this);
            this.initialPauseTimer.start();
        },

        hoverShipAnimation: function() {
            //Temporarily pause ship above text
            this.hoverShip = true;
            this.hoverShipTimer = this.game.time.create(this.game);
            this.hoverShipTimer.add(2000, function() {
                this.hoverShip = false;
                this.player.angle = 0;
            }, this);
            this.hoverShipTimer.start();
        },

        startEngines: function() {

            //Create Particle Jet Engine Burn
            this.emitter = this.game.add.emitter(this.game.world.centerX, this.game.world.centerY, 400);
            this.emitter.makeParticles('sprites', ['fire1', 'fire2', 'fire3', 'smoke-puff']);
            this.emitter.gravity = 200;
            this.emitter.setAlpha(1, 0, 2000);
            this.emitter.setScale(0.4, 0, 0.4, 0, 2000);
            this.emitter.start(false, 3000, 3);
            this.burnEngines = true;
            this.sound.play('rocket-start');
        },

        startGame: function(pointer) {

            this.sound.stop('aronara');

            //Load Proper State for Player
            this.state.start(this.playerStats.returnPlayerToState);
        }

    };
From reading through the source code you can see that the MainMenu.js file does a few key things:
- Checks if the current player has saved game data, and renders it
- Creates the background, starts scrolling the screen, adds the rocket
- Plays the intro music
- Runs an initial "flying scene" with afterburners and a subtle speed-up
- Sets up a startGame function, bound to the start button
A good splashscreen could be as simple as a static background image with a start button. The main goal is to provide an introduction to the game. Notice I've created a mute button on the intro scene - but not a pause button. It's a good idea to give your player the option to mute the game early on in case they're playing in a situation where they don't want sound output. However, on this particular screen a pause button is irrelevant, since the intro scene will loop forever until the user taps or clicks Start.
Creating and Linking Separate Levels
At a high level, the process of creating and linking together separate levels involves writing a separate .js file representing each level and placing it in the src/ directory. I'd strongly suggest naming each file after the scene or level it renders. This way you can always quickly and easily find the file you need to edit when you want to make a change to a particular level. Once we're code complete on our game, our build tool will gather up all these separate .js files and concatenate them into a single file that represents our Phaser game.
Making Levels Unique with New Game Mechanics
In the case of CanyonRunner, I looked at each level as an opportunity to explore a new game mechanic. Level 1 is the most straightfoward level and the easiest level to complete. This is because I'm conscientiously using it to introduce players to the first main game mechanic that will be carried throughout the game: avoiding craggy and somewhat randomized spires.
While Level 1 is not the most exciting or challenging level, it is a necessary introduction to a few key facts that a successful player of CanyonRunner must understand:
- Spires are coming at you constantly, in varying and sometimes unpredictable positions
- Smashing into a spire causes you damage
- Your rocket can take up to 3 hits before exploding
- You can "heal" your rocket by catching medkits (yes, medkits - it's a cartoony game)
- When backed into a corner, you can blast spires with your missiles
- Your missiles are unlimited, but take a long time to reload, so you have to fire carefully
When you break out the key lessons like this, it becomes clear that there's actually a good deal going on in the first level. Meanwhile, these are concepts that are true for every subsequent level in CanyonRunner, so it's important to get clear on them upfront.
Level 2 is my personal favorite and it introduces a completely new game mechanic: dogfights. In level 2, you are hounded by a series of bandits armed with missiles as powerful as your own. Taking a hit from one of these enemy missiles means instant death and restarting the level. There's an entire mini-game to figuring out how the bandits behave and track you, and what you have to do in order to actually hit them with a missile.
At the same time you're dodging enemy missiles and trying to shoot down bandits, those spires and healthkits are still coming at you in somewhat randomized fashion. Thus, the gameplay here is compounding and builds upon previous mechanics. At times, you may be forced by an enemy missile to take a direct hit from a spire, since you know your rocket can withstand up to three of those, but will be instantly destroyed by an enemy missile.
Level 3 likewise introduces its own unique mechanic: a vicious meteor storm. While continuing to dodge spires and collect healthkits that are coming at you horizontally, you must also successfully dodge somewhat randomized and potentially very fast meteoroids that are raining down on you vertically. As is true with the spires, your rocket can survive up to three direct hits from a meteoroid. The now two planes of deadly obstacles compound on one another to create the most movement-intensive level in CanyonRunner.
Incrementally introducing new game mechanics in this manner is a good way to increasingly challenge your players as your game progresses, while still making the gameplay feel logical and sensible. Throwing all of these mechanics at the player from the get-go could result in the game feeling overly complex and runs the risk of alienating and overwhelming the player, who is then unlikely to return. It's far better to allow the player to make some degree of progress while learning the core mechanics before throwing your biggest challenges at them.
Handling transitions between levels
Let's take a quick look at how level1.js handles the next 3 possible states following play:
- The user succeeds - and should be passed to the next scene
- The user fails - and should be passed to the main menu after we preserve their game data
- The user quits - and should be passed directly to the main menu
Here are the functions at the end of level1.js that handle these transitions. While the crux of switching states is calling Phaser's state.start method, you'll usually want to perform certain tear-down or data persistance tasks before making the switch:
    handleUserDataGameLoss: function () {
        //Handle Player Scores and Times
        this.interval = 0;
        this.step = this.playerStats.topScore - this.interval;
        if (this.score > this.step) {
            this.playerStats.topScore = this.interval + this.score;
        }
        this.playerStats.topTime = this.playerStats.topTime + this.survivalTimer.seconds;

        localStorage.setItem('Canyon_Runner_9282733_playerStats', JSON.stringify(this.playerStats));
        //Reset Game After Pause
        this.resetTimer = this.game.time.create(this.game);
        this.resetTimer.add(4000, function () {
            this.explosion.kill();
            this.game.state.start('MainMenu');
        }, this);
        this.resetTimer.start();
    },
    handleUserDataLevelComplete: function () {
        //Handle Player Scores and Times
        this.playerStats.topScore = 50;
        this.playerStats.topTime = this.playerStats.topTime + this.survivalTimer.seconds;
        //Set Highest Level Completed by Player
        this.playerStats.returnPlayerToState = 'NavigationBandit';

        localStorage.setItem('Canyon_Runner_9282733_playerStats', JSON.stringify(this.playerStats));

        this.buttonAdvance = this.game.add.button(350, 500, 'sprites', this.nextLevel, this, 'advance-button', 'advance-button', 'advance-button');
        this.buttonAdvance.fixedToCamera = true;
    },
    nextLevel: function () {
        this.sound.stop('success');
        this.state.start('NavigationBandit');
    },
    quitGame: function (pointer) {
        this.state.start('MainMenu');
    }
In the case of the player failing or succeeding on the given level, their latest score, their furthest position in the game (as stored in the returnPlayerToState attribute) and their current in-game time are stored via the game's save system before the player is advanced to the next state. See the next section for a complete treatment of a Local Storage based game-save system.
Creating a game save system
HTML5 features a robust storage system known as Local Storage. Local storage offers an attractive means of persisting user data for HTML5 game developers. It is widely supported across many different browser and devices and offers a simple interface for storing and retrieving custom objects.
In the case of CanyonRunner, I store a few key things on the user's system so that I can persist their game progress in case they complete only one or two levels in one session and return later. I call this object playerStats - it's a json object with 3 attributes:
- The user's Top Score (represented by the number of spires they've avoided)
- The user's current time-in-game represented by the number of seconds they've survived
- The name of the game state that the user should be returned to (updated as they progress through the game)
    //////////////////////
    //READ LOCAL STORAGE
    //////////////////////
    this.playerStats;
    if (localStorage.getItem('Canyon_Runner_9282733_playerStats') != null) {
        this.playerStats = JSON.parse(localStorage.getItem('Canyon_Runner_9282733_playerStats'));
    } else {
        this.playerStats = { topScore: 0, topTime: 0, returnPlayerToState: 'HowToPlay'};
    }
The create function of a given Phaser state is the perfect time to inspect localStorage to see if the player already has an object stored (and to create one if they don't).
Invoking the Local Storage API, I use the localStore.getItem method to check for the special object name I use to set save objects for CanyonRunner. The idea here is similar to namespacing your WordPress plugins - you don't have control over the storage keynames that other developers might write to the user's browser via other games, webapps or websites. To prevent collisions, you should namespace your storage object's name to your game - adding some random numbers decreases the chances of collision.
In the previous gist above, you can see the logic for updating the player's progress and scores in the handlUserDataLoss and handleUserDataLevelComplete functions.
Creating different experiences for desktop and mobile devices
This is probably my personal favorite feature of CanyonRunner. Let's say I have CanyonRunner set up and hosted at a particular URL. If you visit this URL with your desktop / laptop browser, you'll get the full desktop version - complete with the keyboard control scheme and the extra fancy (and resource intensive!) particle effects like rocket and missile afterburners and glowing healing mist on healthkits.
However, should you happen to hit the same URL with your smartphone, you'll be given the optimized mobile version, with touchpad controls rendered right over the game scene, and no particle effects (to drastically improve mobile performance).
I implemented this feature because I wanted one single instance of the CanyonRunner game to work for all players regardless of what device they were using to play. As the game developer, this also makes my life easier, because once I have the logic and assets in place to handle and serve the two different versions of the game, I don't have to worry about supporting and keeping on parity two actually separate codebases.
The two main pieces to this feature are the game logic that checks for whether the player is using a desktop or mobile device, and the assets and functions that work together to render the mobile touchpad on screen and bind its buttons to the correct player actions. Let's take a look:
    CanyonRunner.Level1.prototype = {

            create: function() {
                    //START MUSIC
                    ///////////////////
                    this.sound = this.game.add.audioSprite('sound');
                    this.sound.play('aronara');
                    //////////////////
                    //SET BACKGROUND
                    //////////////////
                    this.background = this.game.add.tileSprite(0, -100, 2731, 800, 'desert');
                    this.background.fixedToCamera = true;
                    ///////////////////////
                    //CREATE TOUCH GAMEPAD
                    ///////////////////////
                    //Only Mobile Gets Touchpad
                    if (!this.game.device.desktop) {
                        this.buttonUp = this.game.add.button(this.game.world.centerX - 300, this.game.world.centerY + 50, 'sprites', null, this, 'up-arrow', 'up-arrow', 'up-arrow');
                        this.buttonUp.fixedToCamera = true;
                        this.buttonUp.onInputDown.add(function() {
                            this.up = true;
                        }, this);
                        this.buttonUp.onInputUp.add(function() {
                            this.up = false;
                        }, this);

                        this.buttonRight = this.game.add.button(this.game.world.centerX - 200, this.game.world.centerY + 100, 'sprites', null, this, 'right-arrow', 'right-arrow', 'right-arrow');
                        this.buttonRight.fixedToCamera = true;
                        this.buttonRight.onInputDown.add(function() {
                            this.right = true;
                        }, this);
                        this.buttonRight.onInputUp.add(function() {
                            this.right = false;
                        }, this);

                        this.buttonDown = this.game.add.button(this.game.world.centerX - 300, this.game.world.centerY + 150, 'sprites', null, this, 'down-arrow', 'down-arrow', 'down-arrow');
                        this.buttonDown.fixedToCamera = true;
                        this.buttonDown.onInputDown.add(function() {
                            this.down = true;
                        }, this);
                        this.buttonDown.onInputUp.add(function() {
                            this.down = false;
                        }, this);

                        this.buttonLeft = this.game.add.button(this.game.world.centerX - 400, this.game.world.centerY + 100, 'sprites', null, this, 'left-arrow', 'left-arrow', 'left-arrow');
                        this.buttonLeft.fixedToCamera = true;
                        this.buttonLeft.onInputDown.add(function() {
                            this.left = true;
                        }, this);
                        this.buttonLeft.onInputUp.add(function() {
                            this.left = false;
                        }, this);
                    }
                    //Desktop & Mobile Get Different Firing Buttons
                    if (this.game.device.desktop) {
                        this.fireButton = this.game.add.button(this.game.world.centerX - 60, this.game.world.centerY - 300, 'sprites', null, this, 'fire-missile-button-desktop', 'fire-missile-button-desktop', 'fire-missile-button-desktop');
                        this.fireButton.fixedToCamera = true;
                        this.fireButton.onInputDown.add(function() {
                            this.fireMissile();
                        }, this);

                    } else {
                        this.fireButton = this.game.add.button(this.game.world.centerX - 350, this.game.world.centerY - 150, 'sprites', null, this, 'fire-missile-button-mobile', 'fire-missile-button-mobile', 'fire-missile-button-mobile');
                        this.fireButton.fixedToCamera = true;
                        this.fireButton.onInputDown.add(function() {
                            this.fireMissile();
                        }, this);
                    }

            ...
You can see I'm leveraging Phaser's game.device.desktop method to determine which type of device the player is using, allowing me to implement the two control schemes within an if else statement. Notice that when rendering the mobile gamepad, I'm setting each button's fixedToCamera property to true.
Given that CanyonRunner is a side-scroller, doing this prevents the buttons from sliding off the screen at the start of the level, which would make them considerably less useful to the player.
Phaser's helper device methods that determine which kind of device your players are using make it easy to optimize your game experience for desktop, mobile and tablet form-factors simultaneously.
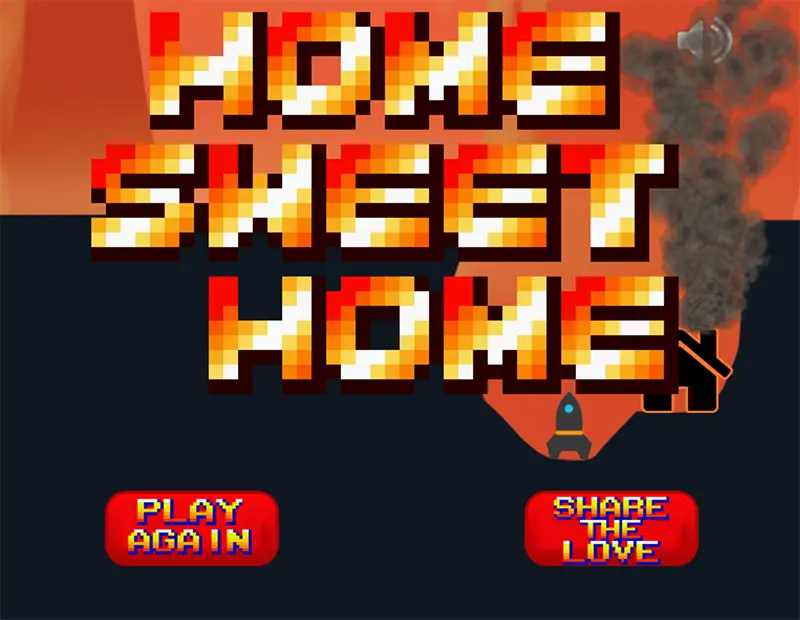
Creating multiple endings depending upon player performance
Recent triple A titles as well as classic old school games have explored the concept of multiple endings. Multiple endings increase replay value by allowing players to do multiple playthroughs, following different paths or making different major plot decisions depending on the type of ending they are trying to get.
Multiple endings also allow you to make thematic statements about the kinds of choices, behaviors or chance occurrences that lead to your protagonist achieving either glory or infamy, salvation or condemnation.
I wanted to explore this concept with CanyonRunner, so I implemented a simple multiple ending system. You will get one of two possible endings when you play through CanyonRunner, depending upon how quickly you complete the game. This is one of the reasons that I keep track of the player's "Top Time" or total number of seconds since beginning to play through Level 1. This concept of time being precious and limited is thematically harmonious with CanyonRunner's story: you are racing desperately needed food and supplies home to your family in a barren post-apocalyptic wasteland. If you take too long doing so, you simply no longer have a family to return to.
Creating multiple endings
If you want to implement multiple endings in your own Phaser game, the underlying logic of how you determine which ending a player unlocks is up to you, but here's a high level overview of how you would organize such a concept in your code:
As the player progresses through your game, you keep tabs on one or more performance metrics. This could be their total score, how many hostages they rescued, what physical percentage of the world they explored and walked over, how much gold they ended up with, how many innocents they waxed, etc. If you want this to persist between game sessions, you'll want to store this information either via Local Storage, a cookie, or your user database if you have one.
After the player has completed the final level, or slain the final boss, or found the final hidden object, at whichever point in your particular game the player is considered to have "won", you can have some logic that inspects this player performance information to make a determination about which game state they will proceed to.
Maybe your player collected over 1500 gold throughout the course of playing, and rescued 25 innocents, so they'll receive the "You are rich and beneficent and live happily ever after" ending. Maybe they killed every NPC they came across to enrich themselves, so they'll get the "You're an infamous monster that nobody likes" ending.
At this point, actually showing the player the correct ending is simply a matter of calling game.state.start with the right state name for the ending they've earned.
Creating the Ending-Determining Game Logic
Let's take a look at how I implemented this in CanyonRunner. Regardless of which ending the player will ultimately unlock, all players will see this interstitial scene after completing the 3rd level. It's the scene that shows the CanyonRunner obtaining a lock on their home beacon and descending to land at home. This makes it a great place to execute the logic that determines which ending to give the player, since this is something that can be done in the background while the player is watching the actual scene on screen. You can see where I'm determining and starting the correct ending within the rocketLanding function:
    CanyonRunner.EmotionalFulcrum = function(game) {

        this.angelicVoices = null;
    };

    CanyonRunner.EmotionalFulcrum.prototype = {

        create: function() {
            this.sound = this.game.add.audioSprite('sound');
            this.sound.play('sonar');

            //Set Background
            this.background = this.game.add.tileSprite(0, 0, 1200, 800, 'sad-desert');
            this.background.fixedToCamera = true;
            /////////////////////////////
            //CREATE SOUND TOGGLE BUTTON
            /////////////////////////////
            this.soundButton = this.game.add.button(this.game.world.centerX + 240, this.game.world.centerY - 290, 'sprites', this.toggleMute, this, 'sound-icon', 'sound-icon', 'sound-icon');
            this.soundButton.fixedToCamera = true;
            if (!this.game.sound.mute) {
                this.soundButton.tint = 16777215;
            } else {
                this.soundButton.tint = 16711680;
            }
            //////////////////////
            //READ LOCAL STORAGE
            //////////////////////
            this.playerStats;
            if (localStorage.getItem('Canyon_Runner_9282733_playerStats') != null) {
                this.playerStats = JSON.parse(localStorage.getItem('Canyon_Runner_9282733_playerStats'));
            } else {
                this.playerStats = {
                    topScore: 0,
                    topTime: 0,
                    returnPlayerToState: 'NavigationHome'
                };
            }
            //////////////////
            //CREATE PLAYER
            //////////////////
            this.player = this.game.add.sprite(64, 64, 'sprites', 'rocket-sprite');
            this.player.y = 120;
            this.game.physics.enable(this.player, Phaser.Physics.ARCADE);
            ///////////////////////////////////
            //Create Particle Jet Engine Burn
            ///////////////////////////////////
            this.emitter = this.game.add.emitter(this.game.world.centerX, this.game.world.centerY, 400);
            this.emitter.makeParticles('sprites', ['fire1', 'fire2', 'fire3', 'smoke-puff']);
            this.emitter.gravity = 20;
            this.emitter.setAlpha(1, 0, 3000);
            this.emitter.setScale(0.4, 0, 0.4, 0, 5000);
            this.emitter.start(false, 3000, 5);
            this.emitter.emitX = this.player.x - 25;
            this.emitter.emitY = this.player.y + 30;
            this.burnEngines = true;

            this.descendToLearnTheTruth();
        },

        update: function() {

            this.emitter.emitX = this.player.x - 25;
            this.emitter.emitY = this.player.y + 30;

            if (this.landing) {
                this.landingEmitter.emitX = this.player.x + 27;
                this.landingEmitter.emitY = this.player.y + 30;
            }

            //At rest, player should not move
            this.player.body.velocity.x = 0;
            this.player.body.velocity.y = 0;

            this.playerSpeed = 250;
            this.backgroundTileSpeed = 4;

            //Scroll background for flying appearance
            if (this.slowRocket) {
                this.background.tilePosition.x -= 4;
                this.sound.play('sonar-found');
            } else if (this.stopRocket) {
                this.background.tilePosition.x = 0;
                if (Math.floor(this.player.angle == -90)) {
                    this.stopRocket = false;
                    this.player.angle = -90;
                    this.rocketLanding();
                }
                this.player.angle -= 2;
            } else if (!this.landing) {
                this.background.tilePosition.x -= 10;
            }
        },
        toggleMute: function() {
            if (!this.mute) {
                this.game.sound.mute = true;
                this.mute = true;
                this.soundButton.tint = 16711680;
            } else {
                this.game.sound.mute = false;
                this.mute = false;
                this.soundButton.tint = 16777215;

            }
        },
        descendToLearnTheTruth: function() {
            this.sound.play('sonar-found');
            this.homeSignatureLockedTextStyle = {
                font: "25px Arial",
                fill: "#09e000",
                stroke: "#000",
                strokeThickness: 4,
                align: "center"
            };
            this.homeSignatureLockedTextString = "Home Signature Detected! Calculating Landing Trajectory!"
            this.homeSignatureLockedText = this.game.add.text(this.player.x + 20, this.player.y, this.homeSignatureLockedTextString, this.homeSignatureLockedTextStyle);
            this.homeSignatureLockedTextExpiration = this.game.time.create(this.game);
            this.homeSignatureLockedTextExpiration.add(4000, function() {
                this.homeSignatureLockedText.destroy();
            }, this);
            this.homeSignatureLockedTextExpiration.start();
            this.game.add.tween(this.player).to({
                x: this.game.world.centerX,
                y: this.game.world.centerY + 100
            }, 5000, Phaser.Easing.Linear.None, true);
            this.descendTimer = this.game.time.create(this.game);
            this.descendTimer.add(4900, function() {
                this.slowRocket = true;
                this.emitter.kill();
            }, this);
            this.descendTimer.start();
            this.beginLandingTimer = this.game.time.create(this.game);
            this.beginLandingTimer.add(5300, function() {
                this.slowRocket = false;
                this.stopRocket = true;
            }, this);
            this.beginLandingTimer.start();
        },
        rocketLanding: function() {
            this.sound.stop('sonar');
            this.sound.play('angel');
            this.landing = true;
            this.landingEmitter = this.game.add.emitter(this.player.x, this.player.y, 400);
            this.landingEmitter.makeParticles('sprites', ['smoke-puff']);
            this.landingEmitter.gravity = 20;
            this.landingEmitter.setAlpha(1, 0, 3000);
            this.landingEmitter.setScale(0.4, 0, 0.4, 0, 5000);
            this.landingEmitter.start(false, 3000, 5);
            this.landingEmitter.emitX = this.player.x - 25;
            this.landingEmitter.emitY = this.player.y + 30;
            //Landing Tween
            this.game.add.tween(this.player).to({
                y: this.player.y + 350
            }, 10500, Phaser.Easing.Linear.None, true);
            //Jump to Final Scene Timer
            this.showFinalSceneTimer = this.game.time.create(this.game);
            this.showFinalSceneTimer.add(10500, function() {
                this.sound.stop('sonar');
                this.sound.stop('angel');
                if (this.playerStats.topTime > 355) {
                    this.state.start('EveryThingYouBelievedAboutYourFamilyWasHellishlyWrong');
                } else if (this.playerStats.topTime <= 375) {
                    this.state.start('HomeSweetHome');
                } else {
                    this.state.start('EveryThingYouBelievedAboutYourFamilyWasHellishlyWrong');
                }
            }, this);
            this.showFinalSceneTimer.start();
        }

    };
Settings buttons - pause & mute
While implementing pause and mute buttons may seem like a small and unimportant task for certain games, the importance of doing exactly this cannot be overstated. It is massively annoying as a player to load up a game while trying to kill some time in a business meeting or to steal a few moments of succor from a family dinner or spousal argument only to have your smartphone erupt in obnoxious, poorly dubbed dubstep that you scramble to mute - only to find there is no mute button. This is exactly the kind of oversight that will drive your players away for good.
Luckily for us, Phaser makes it simple to implement Pause and Mute buttons - so let's go ahead and do that:
    /////////////////////////////
    //CREATE SOUND TOGGLE BUTTON
    /////////////////////////////
    this.soundButton = this.game.add.button(this.game.world.centerX + 240, this.game.world.centerY - 290, 'sprites', this.toggleMute, this, 'sound-icon', 'sound-icon', 'sound-icon');
    this.soundButton.fixedToCamera = true;
    if (!this.game.sound.mute) {
        this.soundButton.tint = 16777215;
    } else {
        this.soundButton.tint = 16711680;
    }
    //////////////////////
    //CREATE PAUSE BUTTON
    //////////////////////
    this.pauseButton = this.game.add.sprite(this.game.world.centerX + 320, this.game.world.centerY - 280, 'sprites', 'pause-button');
    this.pauseButton.inputEnabled = true;
    this.pauseButton.fixedToCamera = true;
    this.pauseButton.events.onInputUp.add(function() {
        this.game.paused = true;
        this.pauseButton.tint = 16711680;
    }, this);
    this.game.input.onDown.add(function() {
        if (this.game.paused) this.game.paused = false;
        this.pauseButton.tint = 16777215;
    }, this);

    ...

    toggleMute: function() {
        if (!this.game.sound.mute) {
            this.game.sound.mute = true;
            this.soundButton.tint = 16711680;
        } else {
            this.game.sound.mute = false;
            this.soundButton.tint = 16777215;
        }
    },
As with our mobile touchpad buttons, it's important to set the fixedToCamera attribute to true on any icon or button we want to remain in place in our side-scroller game.
Notice that I conditionally tint the pause and mute buttons depending upon their status - this is an easy way to make the buttons and the entire game interface feel more responsive, as well as to provide a necessary visual signal to the player about whether or not the game is currently paused or muted.
As you can see in the code, Phaser is doing all the heavy lifting for us when it comes to actually pausing game execution or muting sound. As developers, we need only flip the boolean property of game.sound.mute or game.paused as makes sense within our interface logic, and the framework handles it from there.
That's All for Now
I hope this tutorial and examination of some of CanyonRunner's game mechanics and features was helpful to you. If it was, please say thanks by sharing this post or starring the CanyonRunner repo on Github.
If something isn't clear or if you'd like to see some other feature or mechanic explained that isn't called out here, or if you just have general feedback, please drop me an e-mail.

Discussion
Giscus