
This is the Free Overview
This page gives you the architecture, mental model, and key moving parts of a production RAG pipeline.
I'm even giving you the full source code on GitHub, but for the best experience and to ensure you don't miss anything, be sure to unlock the full tutorial.
I’ve shipped this pattern in the real world. On my site, visitors can chat with my writing and get related articles as sources.
Here’s a quick demo — or try it yourself:

What you’ll learn here
You’ll leave with a clear picture of how a real RAG pipeline works and where each tool fits.
The build-ready assets (notebooks, complete Next.js app, CI/CD) live in the premium tutorial.
Free vs. Premium
This page is a high-level Free Overview. The Premium Tutorial is the complete, production-ready implementation.
| Free Overview | Premium Tutorial ($149) | |
|---|---|---|
| Concepts & architecture | ✅ | ✅ |
| Diagrams & explanations | ✅ | ✅ |
| Sample snippets | ✅ | ✅ |
| Complete Jupyter notebooks | ✅ (GitHub) | ✅ (Guided) |
| Full Next.js app | ✅ (GitHub) | ✅ (Guided) |
| CI/CD & deployment | ✅ (GitHub) | ✅ (Guided) |
| Step-by-step walkthroughs | ❌ | ✅ |
| Production hardening | ❌ | ✅ |
| Troubleshooting support | ❌ | ✅ |
Architecture and data flow
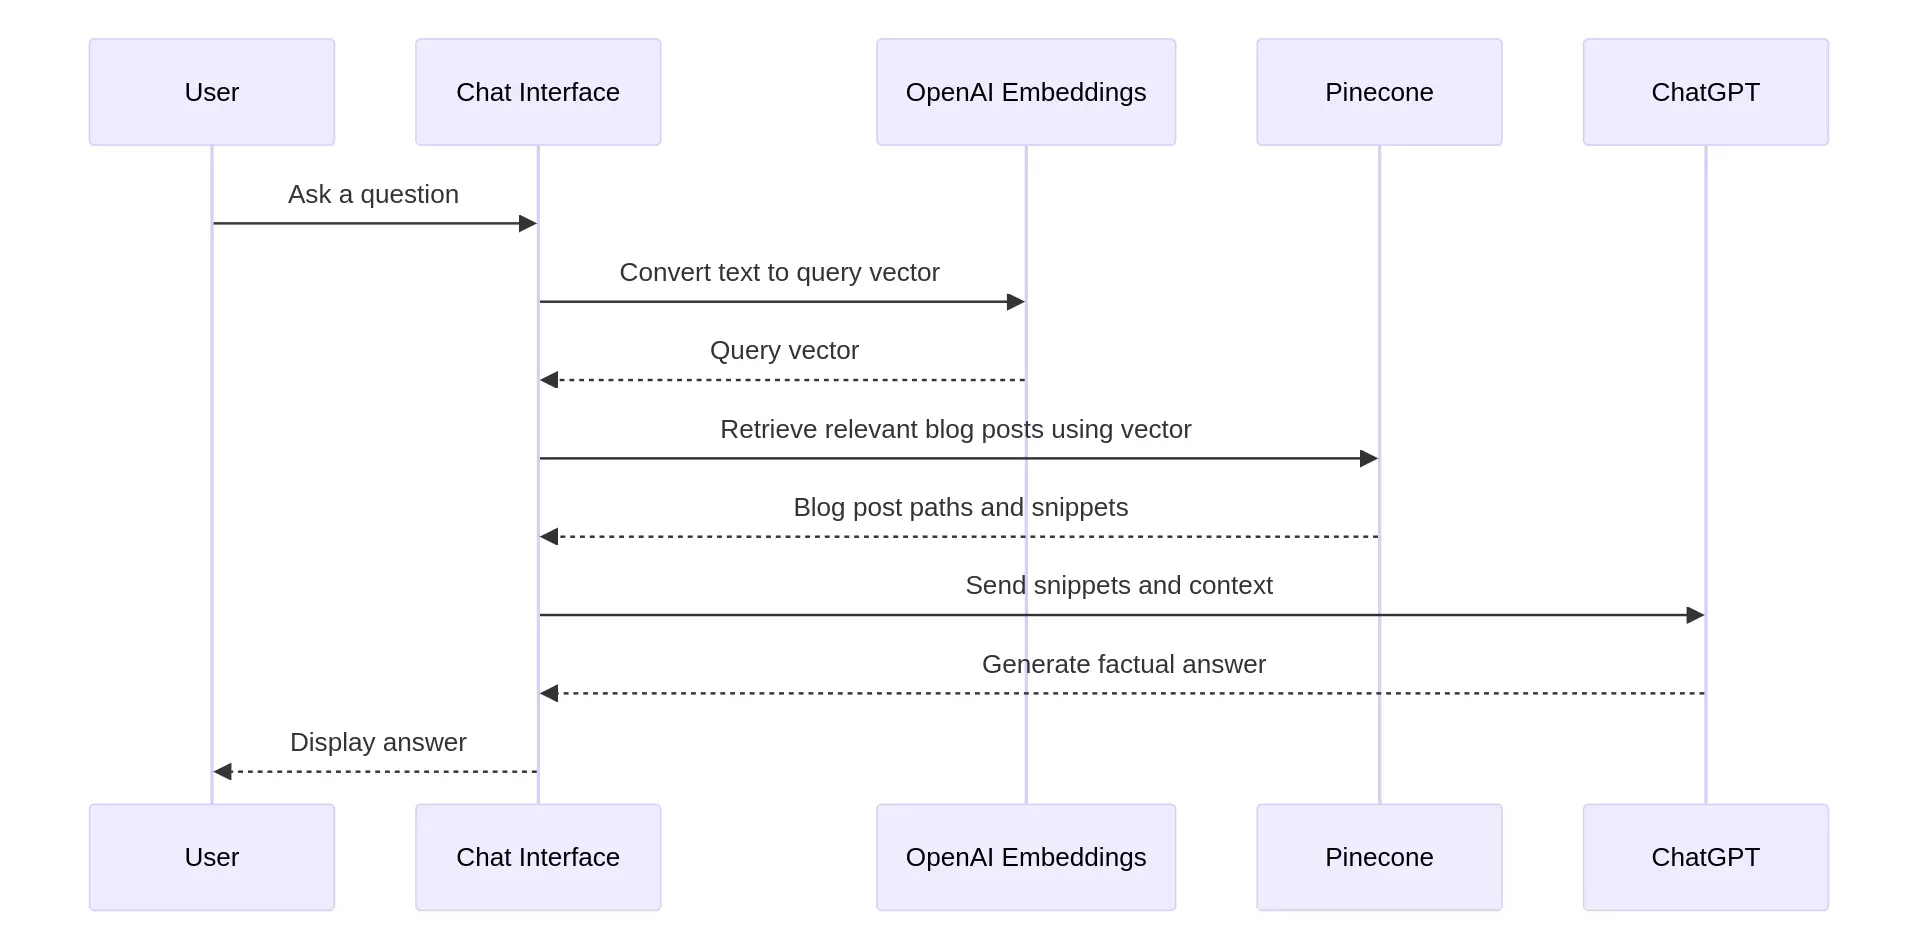
At a glance, a production RAG loop looks like this:
- User question → API route receives the message.
- Embedding → Convert question to a vector (OpenAI
text-embedding-3-large). - Vector search → Query Pinecone for nearest chunks.
- Prompt assembly → Inject retrieved text into the model prompt.
- Response + sources → Stream the answer and surface citations.
Reference implementation (unsupported)
If you're comfortable hacking, here's the unsupported code I use in the tutorial:
- Notebook: https://github.com/zackproser/rag-pipeline-tutorial-notebook
- Next.js app: https://github.com/zackproser/rag-pipeline-tutorial
Quickstart (DIY, no guardrails):
git clone https://github.com/zackproser/rag-pipeline-tutorial.git
cd rag-pipeline-tutorial
cp .env.example .env.local     # add OPENAI_API_KEY, PINECONE_API_KEY
# create a Pinecone index with dimension 3072 (text-embedding-3-large)
npm i && npm run dev
This path is DIY: no CI/CD, no debugging help, no deployment hardening, and no guided walkthroughs.
For the curated, production-ready path (full notebooks, complete app, CI/CD, deploy steps, troubleshooting):
Unlock Premium – $149.
Get the full Jupyter notebook + complete Next.js app + CI/CD in the premium tutorial.
👉 Unlock Premium – $149
Minimal server shape (conceptual)
// /api/chat (conceptual; trimmed for clarity)
const lastMessage = messages.at(-1)
const queryEmbedding = await embed(lastMessage.content)        // OpenAI embeddings
const matches = await pineconeQuery(queryEmbedding, { topK: 8 }) // nearest chunks
const contextText = matches.map(m => m.metadata.text).join('\n').slice(0, 3000)

const system = `
START CONTEXT
${contextText}
END CONTEXT
Follow context; cite sources; don't hallucinate.
`

// streamText(...) — Vercel AI SDK (premium shows complete route)

Discussion
Giscus